

Our existing installer (based on InstallAnywhere) is looking quite long in the tooth, and the tooling associated with it (licensing, where we can run the installer builds) isn’t filling the team with joy. 3.10.1 introduces a new JavaFX based installer UI that allows you to pre-select all the optional components so that dependencies are resolved at the point of installation. In order to be able to use it, you will need a JavaFX enabled runtime.
A JavaFX enabled runtime means that you are either using an Oracle supplied JDK/JRE or you’re using a OpenJDK with OpenJFX installation. Depending on your underlying OS, this can actually be harder that you’d expect. Thankfully Azul Systems have an OpenJDK+FX build available for you to install and this is ordinarily what we would recommend you use.
Windows
The easiest way on Windows is to use scoop.sh to manage your java installations. Once you have the java bucket enabled then you can just do scoop install zulufx8 to install the right JDK. There’s probably a chocolatey equivalent as well. I’ve been running this as my main Java 8 installation on Windows 10 with no problems; previously I was running the zulu8 package.
Mac
Since Azul appear to distribute the JavaFX variant just as a zip file, I’ve made available a Homebrew cask (it isn’t integrated into the mainline homebrew since I’m not too sure about it) that’s available on github that puts it in the right place for /usr/libexec/java_home. Since it is semantically equivalent to the existing zulu8 package that is available via Homebrew, it is marked as conflicting with it. As far as I can tell, it’s functionally equivalent to the zulu8 package, and I’ve been running it as my main Java 8 install on the Mac with no problems.
- brew tap quotidian-ennui/zulufx
- brew cask install zulufx8
- /usr/libexec/java_home -v 1.8
Linux
You’re on your own here ;). I don’t have a linux installation where I am running it with a UI; since this installer, by its very nature, has a pretty UI for you to click through; I haven’t even tried to run it on Linux.
Executing the installer
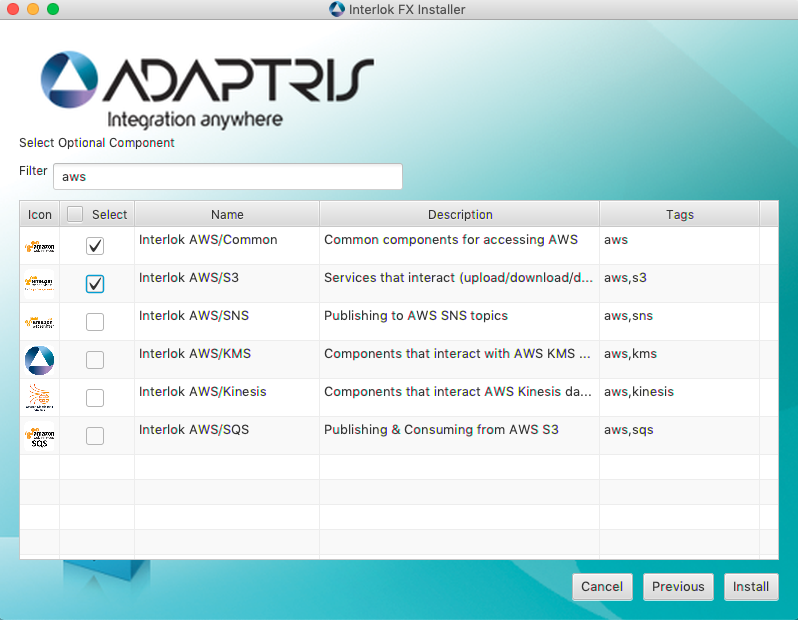
All you need to do is java -jar interlok-fx-installer.jar and then select the optional components you want to include. At the moment, the list isn’t sorted, so the order is largely dependent on how our maven repository decides to behave.
Once you have clicked all the optional components you want then you can let the build do its thing into the directory of your choosing. You can optionally search for tags, so you can pre-filter based on on AWS for instance
- There is no executable created as part of the installer; you’re going to be using the java command to start interlok
java -jar lib/interlok-boot.jar - If you need to wrap the installation as a Windows Service that consider using something like Windows Service Wrapper which can wrap any arbitrary executable like java.
- It’s available on github if you want to check it out.
- Behind the scenes it actually uses
gradleto build up the dependencies, and it will make the build.gradle file available for you after the installation has finished if that’s what you want.